Fast-forward to a few months ago, and we realize that we really don't have the time or energy to do DIY letterpress. With both of us working (no time to take classes although I still want to someday) and no money tree in the back yard (can't throw $$ at potentially crappy presses bought off eBay), we looked into buying letterpress invitations. Couldn't be THAT expensive, right? Wrong, as with so many aspects of hosting a wedding. After requesting a few quotes, we were resigned that letterpress was not going to work within our budget.
I want to pause a moment here, and talk about our motivation for having letterpress invitations. First, I'll point out that letterpress wedding invitations are exceedingly trendy right now, and there are lots of great, local places that will hook you up. The invitations look and feel fabulous, but they're still expensive, and that's just not for everyone. You don't need to have letterpress invitations to have a fabulous wedding. Ultimately, wedding invitations can be had for free.
The reason we like letterpress is the handcrafted nature of the end product, and the connection it has to a real person. When I took my Book Arts class at UCSC, I learned a little bit about typeface design (most of which I've forgotten) and Future Hubs is a self-described font geek. For us, the artistry inherent in the printed word and the connection with another human being is what hand-printed invitations are really about. We'd look into it even if everyone else wasn't doing it.
That's why we were so lucky to find Starshaped Press. Jen and Sarah use presses and type (real metal and wood type) the way I learned to in my Book Arts class. Their prices were shockingly reasonable compared to anyone else I'd talked to about hand printed invitations, and best of all, they said they'd use a linocut that I made. Future Hubs had his heart set on a large tree as part of our invitations (eventually we got to a point where he wouldn't look at anything else), but all their tree ornaments were rather small. We weren't just excited that they'd use our linocut. They'd use it with one of their existing invitation styles at no extra charge (and boy can those "custom work" charges pile up in the wedding invitation world)! Their samples package took my breath away. We were in Santa Cruz one afternoon, and I stopped by the same local art supply store that I bought my first linoleum block from, along with the carving tools. All that was left was to make the cuts.
Two weekends ago, I made a small tree, thinking we weren't going to have much room on the sheet for the image. Here's that result, on a 2x3 inch block:

Then we got a few more samples, and I realized we'd want a bigger tree than the one I made. I wasn't too terribly pleased with the little one anyway, so I sat down to start working in earnest on the 3x5 block. Here's the setup: tools, materials, designs, and a snack.
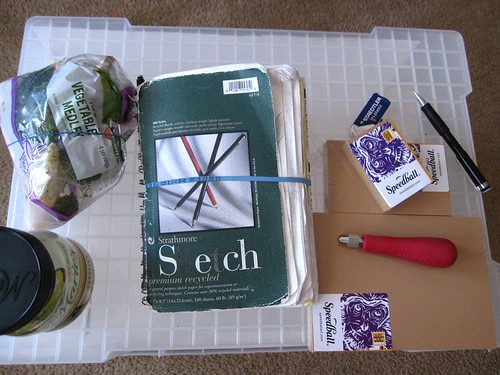
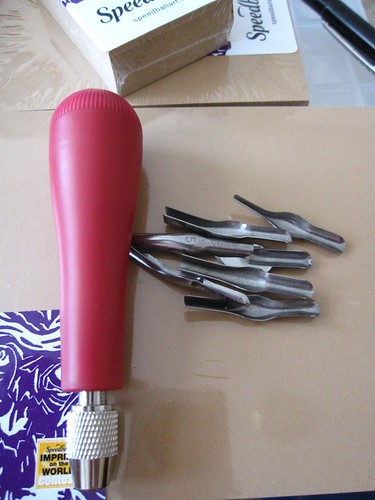
The carving tool is not something to just hand over to your second-grader. It's a hard plastic handle, and several very sharp gouges that can be locked into place in the handle. So far, I've only stabbed myself once (which I count as very good considering I last did this 7 years ago).
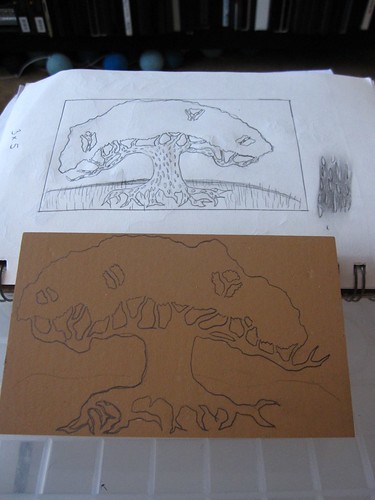
First, I took out my sketch of the design:

As with all printmaking, you have to keep in mind that the image you carve into the linoleum will be mirrored in the print. This was a big pain in the butt when I did text on my Silmarillion poster, but not such a huge deal here. Next, I sketch the design onto the block:
After that, I put on an audiobook and started carving. Here's some of the outline:
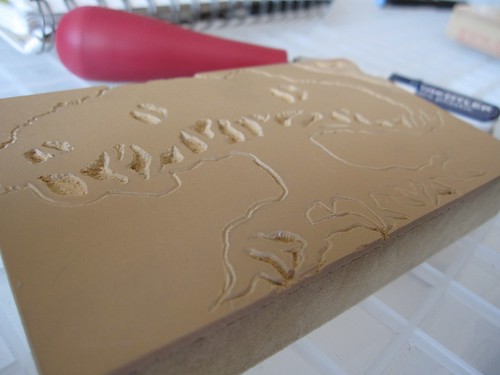
I also experimented in a corner with some shading techniques. I love the way the bark looked on my Silmarillion tree, but wanted to do something more natural and less stylized for this one.
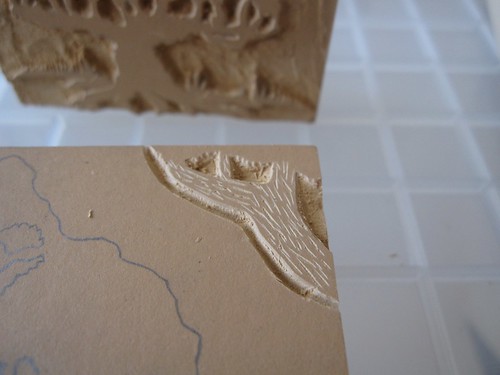
I tried that out on the small tree, but didn't like the way it looked. I did come up with a way to add depth to the leaves of the tree, and my grass started looking more and more natural, but I had to sleep on the bark. After some more experimental carving on Wednesday morning, I found something I liked. I hope it prints well.

The linocut is off to Chicago.


2 comments:
have you seen the twin oaks pattern in the spring 2010 twist collective?
http://twistcollective.com/2010/spring/magazinepage_056.php
looks like your lino. maybe you can make a pair for everyone in your bridal party. ;)
Look like your lino thanx
Post a Comment