Friday, August 19, 2011

More Finishing

First of all, yes, I've started something new. In fact, two somethings new. But I'm saving them (so sneaky!) so that I have something to blog about next week, which is the first week of classes. Stress levels will be high, creativity will likely be low, and I'll need something easy to blog about. In the meantime, I have one more finished item to share:


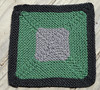
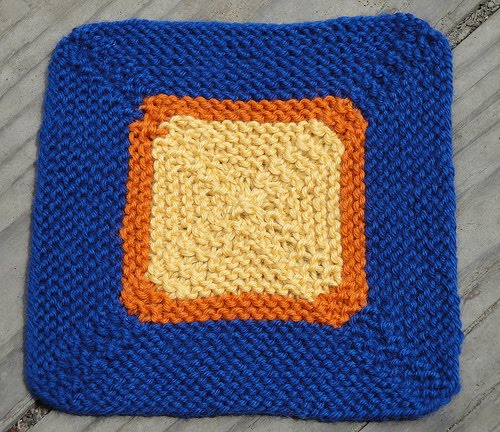
The pattern for the baby blanket squares (that I previously blogged about here) is finally ready! It's free and up on Ravelry as the Garter Outside-In Mitered Square.

The design process for the square was radically different than what I went through with either of the mitten patterns. It's been like one of those movies that is kinda long, and feels like it has more than one ending. You sit there, and find yourself thinking "Ok, bladder, I know we have business to take care of but just hold on. The credits are coming up any minute now!" And then fifteen minutes and three sweeping crescendos of music later you're feeling a little anxious and bored, and if you're me, guilty about feeling bored because it was really a good movie and you're still enjoying it, but could they just wrap it up already?


The bulk of this pattern was all written in early spring. What I really learned with this pattern is that the layout, presentation, and all those other elements that my brain tends to think of as "extra" are really quite important to the pattern. As in, they must be done before you publish the pattern. Nevertheless, I felt like the technical brainwork involved with this pattern was minimal compared to the mitten patterns, which is why it's up for free.

Finally, I want to thank all the members of Purl Jam and the One-Sock Sunday group who knit squares for the blanket, proofread the pattern, and offered constructive criticism. It turns out a knitalong with about 20 participants is a great way to test-knit a pattern, and you are the best test knitters! Also my thanks to Erica, Marissa, and TK for coming to my rescue with photos. I've definitely learned my lesson there, and will be a more consistent photographer in the future. Happy knitting, everyone!

Monday, August 15, 2011

Finish-it-up-itis

I might be having a bout with it. Seaming on the mitered square blanket is coming along apace. Four of the six strips are done, which means that I've done more than 2/3 of the seaming. My travel project, the striped Gothsocks, also got finished last night:

Goblin King Gothsocks

These socks were about as simple as possible: 72 stitches on size 1 needles (although I used 0's for the cuff, heels, and toes), 2x2 ribbed cuff, plain stockinette leg and foot, with an simple wedge toe and identical afterthought heel. The Gothsocks yarn is lovely, and I have quite a bit left over. Perhaps some matching fingerless mitts?

Red Birds Quilt

I also finished up the quilt from two posts ago. After I finished the basting, I waffled for a few days over whether to machine quilt or tie this one. I even bought supplies for either option. In the end, I decided to go with the ties. I used 6-strand cotton embroidery thread and put one tie at each corner junction and in the center of each block. Looking at this quilt, I love how the navy blue fabric used for the border and the blocks in the center brings a sense of coherence to the design.

Red Birds Quilt

I'm also very glad I decided to include a strip in the backing. Again with the coherence.

Red Birds Quilt

My favorite elements of this quilt are really summed up in this photo:

Red Birds Quilt

I was pretty careful to sew the bird blocks so that all the birds were facing up, but I missed one. When I first realized I only considered ripping the seam for about 30 seconds. This project had too much momentum. Now, I'm gad I left it the way it is. Every time I see that one bird, I laugh and think of him saying "Herp derp, I'm a bat!" In the original plan, I was going to bind the quilt with the same poppy-red fabric I used in the back, but at the last minute I decided to do the binding in the bird fabric. In the picture above you can see one of the little birds sneaking a peek at us from the binding. I think I ended up with three of these sneaky binding birds. So cute!

So that's the latest FO update for now. But I'm already plotting. The best part about finish-it-up-itis is that after it's made its way though the craft space you get to start new things!

Wednesday, August 10, 2011

Woolbuddy!

Although I don't think of myself as a needle felter, I can definitely see the stress-relief benefits in the craft. Stabbing wool with pointy sharp needles sounds right up my alley some days when I get off work. I'd tried needle felting out at workshops and craft fairs a few times, and I certainly don't have a problem finding feltable wool around here, but for some reason it never really caught on.

One Christmas my mom got me a needle felting kit, and I made one white owl that now serves as our Christmas tree topper:

Christmas Tree

Still, I remained uninspired until I discovered Jackie Huang, the artist behind Woolbuddy. I can't remember precisely when I first saw his work, but I'm fairly sure it was at Bazaar Bizarre a few years back. Then Urban Fauna started carrying his kits (which you can also buy on the Woolbuddy Etsy shop), and I narrowly missed taking a needle felting class with Jackie.

So when I found out that SF's Museum of Craft and Folk Art was hosting a Woolbuddy event in conjunction with Etsy Craft Bar, I was in. Crafting and beer? Yes, please. I stuffed some non-superwash wool into my bag (admission was discounted if you brought your own materials) and hopped on the bus downtown.

It was a good thing that I left early: the line to get in was pretty long by the time things started. I also quickly decided to pay the full admission price, even though I'd brought my own supplies. The materials we got were the same wool that Jackie uses to make his felted plush animals, and it's really beautiful stuff. The color scheme is definitely one of the defining characteristics of all the woolbuddies. We punched away at the wool over pieces of foam, making more owls. I finished the first one a little early, and started a second one with the wool I'd brought. Here's my two finished woolbuddies:

Woolbuddy Owls

The one on the right was made with the provided materials, and I used my own brown and white wool in the one on the left. You can get a sense of the difference by looking at the back of the owls:

Woolbuddy Owls

The woolbuddy wool felts more firmly when compared with the long-staple wool I happened to grab. Additionally, the wool had little bits of dark orange carded into it, which gives the color a nice depth. The blues also had a little green, and the greens a little blue, and the yellows a little orange, and so on. If I ever wanted to make another one, I would definitely consider purchasing the kit just to get those great colors!

The other thing about all the woolbuddy creations that really gets me is the expressions. Eye position, size, and direction make such a huge difference. I think I did a better job emulating his style in my second owl (the eyes are smaller and the body is more round), even though I like the wings on the first one more. He has that one wing up, which makes me think he's being goofy or saying hello. So I guess he's still a little quirky, which is definitely in keeping with the spirit of all woolbuddies.