Thursday, August 23, 2012

Scotland: The Cities


Cities will suck the life right out of you, but in a good way.  This is something I’ve learned is true all over the world.  London, Los Angeles, Munich, San Francisco, Genoa, Berlin, and Lyon have all left me feeling bone-tired and in need of a pint of something after spending a full day seeing their sights, and now I can add Glasgow and Edinburgh to that list.  The first time you see a new city requires a staggering amount of mental energy.  They demand that you take in everything they have to offer: their food (fast and cheap or slow and expensive but almost always good), their buildings (new, old, filled with stories and memories), and their people (folks that really aren’t that different from yourself, although they might speak a different language and have different pictures on their money). 

We saw Glasgow on our first full day in Scotland, which meant that we were still navigating the logistics of driving and caravanning with a large group.  We started at the 
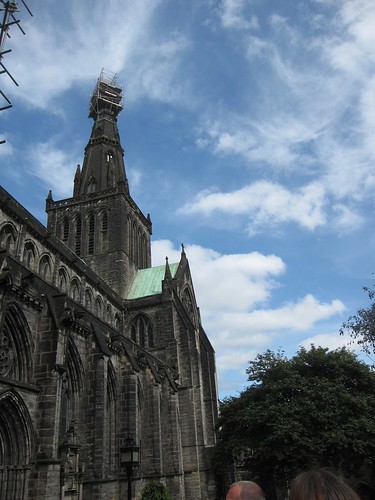
Glasgow Cathedral, which easily rivals anything I saw on the continent in 2008.  Being a huge Harry Potter fan, I was delighted to learn that this church is also known as St. Mungo’s Cathedral. 

Glasgow Cathedral
Glasgow Cathedral (or St. Mungo's)

I loved the sacristy especially, which had several Bible verses spelled out in letter tiles on the floor.  The verses were all centered on the theme of walking and paths.  Around the central pillar it reads “Guide our feet into the way of peace”, and around the edge of the room there are four verses: “He that walketh upright walketh surely”, “Let us run with patience the race that is set before us”, “Hold up my goings in thy paths that I may slip not”, and “”. It seemed to me like the perfect place for pacing contemplation.  A few circuits around the room would be enough to stretch your legs, meditate on the words embedded in the floor, and take you past the fireplace once each turn. 

After lunch in the nearby café, the group split up to see things they each found interesting.  Being huge fans of the Arts & Crafts movement, we went on a trek through the main shopping drag to see the Willow Tea Rooms and the Glasgow School of Art, both designed by Charles Rennie Makintosh.  Sadly we arrived too late to get on one of the tours of the school of art, but we able to peer around some of the buildings.

Glasgow
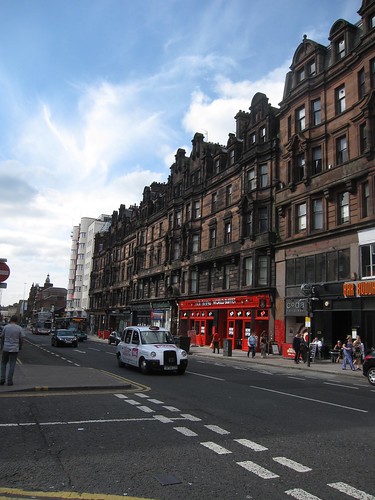
Walking through Glasgow
Even though we didn’t go into many places in Glasgow, we did get to walk around a fair bit and see quite a lot of the city.  At one point we inadvertently walked through a small college in the middle of the city (University of Strathclyde), and unmistakably heard a student playing bagpipes in their dorm room.  Glasgow definitely felt industrial compared to Edinburgh.  If we hadn’t all been nervous about driving home in the dark, I think we would have stayed for dinner and a beer, but as it was we were still tired and turned for home before dark. 

If on our first day I took a few dainty sips of Glasgow, then I certainly tried to swallow Edinburgh whole on our second-to-last day.  August is the festival season for Edinburgh, and the city is notoriously packed, so we decided to take the train into the city early in the morning.  That would drop us off in the middle of everything around 10AM, and the last train back to Pitlochry (our starting point) left around 7:30, which we figured was enough time to hit the highlights.  An additional day in the city would have been nice, but I’d be saying that even if we’d spent a month in Scotland. 

After so much driving during the rest of the week, taking the train was a stroke of genius.  We had a short drive into Pitlochry around 7:30 AM, picked up our tickets from the counter, and spent out train ride discussing what we wanted to see.  Only half of our group wanted to see Edinburgh, so we had a row of seats to ourselves.  I worked on my knitting, and in another Potteresque moment, the husbeast bought coffee from the snack trolley.  We arrived feeling refreshed, and knowing that everyone could have a beer with dinner since nobody had to drive home. 

Pitlochry Train Station
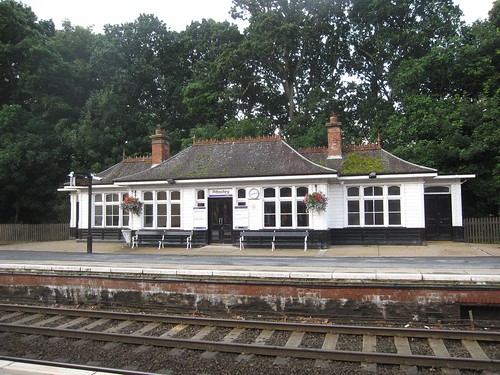
The Pitlochry train station, nearly empty around 8AM.
It took some time for us to get oriented to the city, but we eventually found our way to St. Giles’ Cathedral, our first stop.  

Edinburgh
St. Giles's Cathedral, plus festival tents

I have to mention the place we had lunch: The Outsider, on George IV Bridge Street.  The food and beverages were just delightful: I had coley (a white fish) with mushroom risotto and peas, and the husbeast had a tasty-sounding pork chop.  It was a really delightful place to eat in the middle of the bustle of the city.  Fortified with such excellent food, we got back on the Royal Mile and walked up to Edinburgh Castle.  Unfortunately, we hadn’t really timed it well in terms of the crowds.  We opted to take in the lovely views of the castle’s exterior rather than standing in the line to go inside. 

Edinburgh Castle
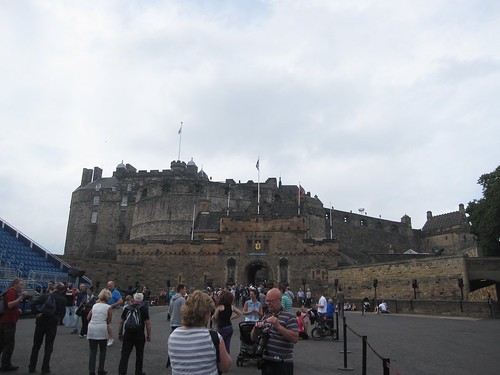
Edinburgh Castle from the outside
The rest of the group was very kind in humoring me in walking back along the Royal Mile and taking a slight detour:
k1 Yarns, Edinburgh
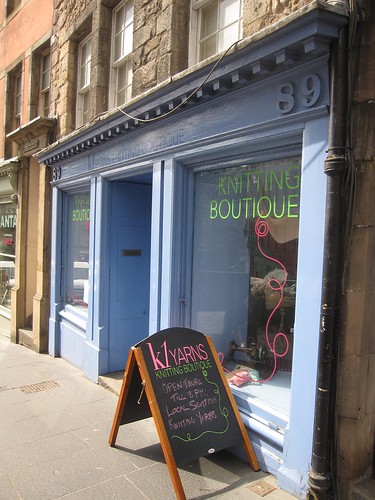
An LYS! In the wild!
I may have bought a little bit of yarn, but more details on that later.  I was very pleased at the selection of Scottish yarns they had available, and the person working when we went in was very helpful in helping one of our party choose yarn to take back for his girlfriend.  The husbeast acquired some cheese while we were yarn shopping.  Our next stop was at the other end of the Royal Mile: Holyrood House Palace, and the Queen’s Gallery. 

Holyrood House Palace
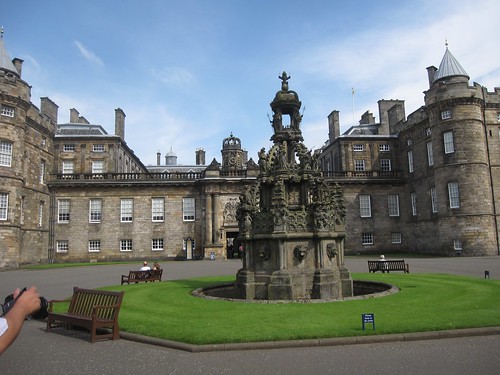
Holyrood House Palace Exterior
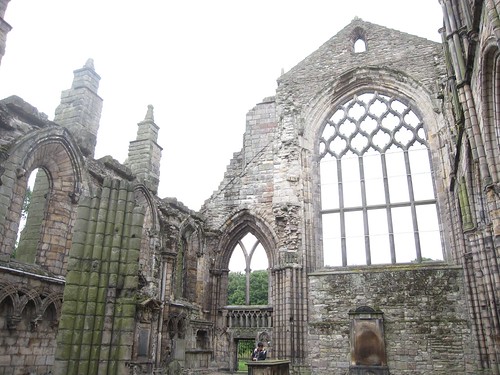
Holyrood was very interesting, and the audioguide included in the ticket price was incredibly detailed.  I particularly enjoyed seeing the rooms inhabited by Mary, Queen of Scots and her portrait.  The ruins of Holyrood Abbey, open to the sky, are a wonderful end cap to the tour of the palace grounds.  I also opted to pay for entrance to the Queen’s Gallery, which had some very fine paintings.

Holyrood Abbey
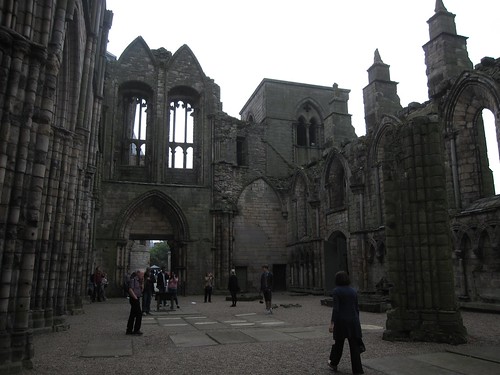
Holyrood Abbey Ruins
At this point, I looked at the time and realized that I was not going to be able to see one of the items on my list: The National Gallery.  It would close in 20 minutes, and was back at the Castle end of the Royal Mile.  We decided to walk back at a more leisurely pace, and did a bit of souvenir shopping along the way.  Since we were all feeling a bit footsore, we opted to make our last activity dinner near the train station.  By the time we finished with dinner, it had started to rain quite heavily.  This made the final walk to the train station a bit harrowing, as we were nervous about getting there in enough time to find our platform (sadly, 19 rather than 9 ¾).  Plus, I was wearing less than ideal footwear, and kept slipping in puddles.  I was also the only one with an umbrella, so we were all quite soggy when we collapsed into our seats on the train. 

Between the rain, my shoes, and the entire day of walking, I was quite exhausted and a bit cranky when we got on the train, but it was nothing that a peaceful ride and a hot cup of tea from the trolley couldn’t fix. 
On the train back from Edinburgh
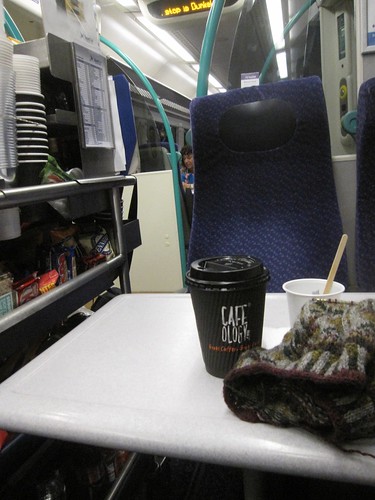
My super-sneaky side shot of the trolley, plus tea & knitting.
Like any good adventure in a big city, the day left us worn out but richer for the experience.  Next time, tales of tromping around the Highlands. 

Monday, August 20, 2012

Scotland: Introduction

Well, I'm back.
Cairngorms
Cairngorm National Park
We had a wonderful time in Scotland, and I'm planning out a few blog posts on our adventures.  I'm thinking one post will be about the country, one about the cities, and one about the yarn/fabric/wool tradition that really permeates the land and industry in Scotland.  This was our third trip across the Atlantic, and I found myself making many comparisons to our travels to Germany, France, and Italy in 2008, and our short trip to London in 2007 (which predates the blog).  In some ways, this trip wasn't as relaxing as those other trips: we had horrendous issues with our flights, and driving on the other side of the road was a bit harrowing for everyone.   Transportation hasn't been such an issue before; we didn't rent a car when we went to London, and everyone else in Europe drives on the same side of the road as we do.  I don't want to get into too many details on how stressful our flights were, but suffice it to say our journey home involved lost seat reservations, a cancelled flight, being awake for 23 hours straight, and an unexpected overnight stay in Newark, NJ.  And that was just on the flight home.  In other ways, this was a truly fantastic trip, better than any other we've taken: there was no language barrier as in Europe, we were more seasoned travelers than when we went to London, and we got to spend quality time with some very dear friends.  Plus, there's sheep everywhere

DSC_9891
A typical view from the car
The strangest part of this vacation is that I didn't feel really rested, or energized, or any of those other sensations that you're supposed to get while on vacation until after it was all over.  Looking over our photos, re-reading my journal in preparation for writing these blog posts, touching the souvenir textiles we brought home, and doing more research on the interesting things we learned are giving me the energy to jump into a new semester.  I truly believe that learning about other parts of the world and getting to know the people who live there makes us better human beings, which is why we choose to travel both inside and outside the US.  I also have a deep-seated love of the British Isles, and I know this journey will add another set of very fond memories to buoy our spirits in the coming months.

Holyrood Abbey
Holyrood Abbey, Edinburgh

Wednesday, August 15, 2012

Sewing FOs: Ginger Skirts

Continuing my love affair with Colette Patterns was difficult, because I was apprehensive about inserting a zipper.  I'd purchased the Hazel dress pattern, and been gifted an invisible zipper foot for my machine for my birthday.  I had more of that lovely soft linen that I used for my Sorbetto tee in a pale lavender.  But I was very wary of going through the process of sewing a whole dress (and my first real dress, too) only to get bogged down in a zipper.  Knitters, I know you can relate: there's always that one really adorable sweater that you have languishing because you have to set in the sleeves or pick up the button band.  You know you can figure it out, but it sits there for a long time while you get your act together.  Same thing with this zipper, except I was putting off the whole dress because of my apprehension.

Ginger Skirt Class at Verb
The view out the shop window.
Luckily for me, Kristine offered a sewing class at Verb on the Ginger skirt, which calls for an invisible zipper!  And it was on a Friday, which was actually incredibly convenient for my schedule.  I signed up for a whole day of sewing class.  I actually had enough time to insert my zipper during class, and sure enough I did it wrong the first time. It was frustrating to have to rip it out, and using the invisible zipper foot was a little non-intuitive, so I'm glad I had a teacher to lead me through the process.  It certainly didn't help that my fabric was a mediumweight navy blue wool, which made it difficult to tell the right side from the wrong side. 

I made version #2 of this skirt, which has a very cute curved waistband.  I wasn't 100% sure that it would show up well in a heavier fabric, but it turned out just fine!
Ginger Skirt
All hemmed and pressed!
I had just finished putting in the zipper when our class time ended, and all the while had been contemplating putting in a lining. Verb's sewing instructor Jessie was incredibly helpful, and talked me through what that process would look like. Once I got home I realized I had a lovely white-and-blue striped cotton voile that was perfect. So I cut the two skirt pattern pieces again, sewed the side seams, and basted the lining to the seam allowance of the waistband. Since I hadn't yet attached the waistband facing, it was just the right stage to make a decision about the lining. I had to wing it at several stages, especially when fitting the lining fabric around the zipper, but it looks fine. And the skirt feels soooo comfy with a smooth cotton lining! I had originally wanted to add pockets as well, but decided it was better to not try too many new things at once.
Ginger Skirt
Lining!  So cute!
The hem, as you can sort of see in the above photo, is very deep.  I made the skirt a few inches shorter than it appears on the model photos on the Colette website to suit my taste.  One thing I've learned about skirts is that they have to end above the widest part of my calf muscle.  I actually made this one shorter still, so it ends right around my knees.  Just like my Owls sweater, the navy blue is a classic color that will merge well with the rest of my clothing.  I've already worn the skirt out to nice dinners twice, and it'll definitely be a good workplace piece as well.  I have ideas for future versions as well: changing the a-line for a more straight or pencil shape, different waistbands that are included in the pattern, adding pockets, and I spotted a beautiful deep red nubby woven wool that would make a great addition for winter.

Wednesday, August 8, 2012

Knitting FO: Owls Sweater

I have been wanting to make Kate Davies' Owls sweater for a long time, probably about 2 milliseconds after I discovered the pattern existed. It's taken me an embarrassingly long time to a) get around to knitting it and b) finishing the darn thing, given how well the design fits with the rest of my wardrobe. I first downloaded the pattern back when it was free, and then purchased it when the designer updated the pattern with better notes and more sizes. This project is a little different than others I've knit because I made lots of changes based on what other knitters said in their project notes on Ravelry.
Owls Sweater
Side view of the yoke
As an aside, I feel that this is one of the best uses of Ravelry, particularly for me since I'm not a model-sized person.  Although there are notable exceptions, not many designers photograph their work in a wide range of sample sizes, so I use Ravelry as a gallery of what any given pattern is going to look like on a larger body type.  I've definitely decided to not knit certain patterns when I discovered I didn't find them that flattering on larger people.

I actually made a ton of modifications to the pattern, starting with the yarn.  I knew from past experience that knitting a sweater out of very chunky yarn adds lots of bulk to my frame.  I certainly don't need to look like I have even more padding than what nature gave me.  Owls calls for a very bulky yarn, and the first thing I did while browsing the 5,000+ projects was see what lighter yarns folks had used to knit the pattern.  Cascade Ecological Wool was a clear winner and turned out to be quite reasonably priced, so I picked out a dark heathered brownish-grey (or is it greyish-brown?  I can't tell!).   The downside of having all this info from Ravelry at my fingertips is that it tells me that I stashed that yarn back in April of 2010.  Yikes!
Cascade Ecological Wool
Three skeins ought to be enough, right?
I started swatching in January to check my gauge like a good knitter, and worked out that I would need to make a sweater just a bit bigger than the largest size in order for it to fit me at the gauge I was getting.  Great, more math. While I was swatching, I made a sort of half-informed decision based on other knitters' project notes to just make up the body and sleeves as I went along.  My reasoning was that I would need to do lots of math to create a larger size anyway because of my gauge, and I've had issues with sleeves being too tight or too short in the past, so I might as well make it from scratch anyway.  So that's what I did!  I figured out how many stitches to cast on based on my swatch (which thankfully did not lie), then decreased at either side for some waist shaping, then increased again on either side for bust shaping, trying it on as I went.  I also remembered to always stand up when trying on the body of a sweater, so I wouldn't end up with something that was only long enough to cover the top of my jeans while sitting.  I finished the body up to the armpits in March, and then promptly declared sleeves to be boring and stuffed the whole thing in a tote bag for several months.

Owls Sweater (in progress) 
And this is where it stayed for three months. 
After finishing a pair of socks more suddenly than I'd intended, I needed to grab something in a hurry for knit night, and remembered that all I had was boring sleeves. Since I was running late, I didn't have time to pick something out of the stash, so it had to be sleeves. I was smart and did my sleeves two-at-a-time though, so at least I didn't have to take too many notes on what I was doing in order to get matching sleeves. After joining the sleeves to the body, the sweater got to be quite unwieldy and not really that good for knitting on the bus, so my progress slowed a bit.  But since I'd been bitten by the sewing bug, a part of me really wanted to include this sweater as part of my Seam Allowance goals.  I know a lot more about knitting than I do about sewing, and I think it shows in how well the sweater turned out.

Owls Sweater
The whole sweater!

I also opted to only sew buttons on one of my owls for a more understated look, as many other Ravelers have done.  I like to think of my owls as being mostly sleepy, with one awake to see what's up.  Now that this sweater is done, I learned that I like my sleeves a LOT longer than what's usually written in a pattern.  The cuffs can be pulled down almost to my knuckles, which keeps my hands warm.  I was able to apply a lot of the knowledge I gained in Ysolda's class last year to make sure that this sweater fit just the way I want it to.  Finally, this sweater is going to be very versatile.  I can pair it with a skirt, tights, and boots for work, or just with jeans for a weekend.  The yarn is warm enough for foggy mornings and evenings, but not knit too dense for California.  I'll be testing it out while we're on vacation next week in another typically cool and misty environment: Scotland!  I have one more regular blog post lined up to run while we're gone, and many adventures to share when we return!

Saturday, August 4, 2012

Sewing FOs: Sorbetto Tanks

This post is a love letter to one of Colette Patterns' most versatile designs, the Sorbetto Tank.  It's a free pattern available on their website.  You print it out on your home printer and tape the paper pieces together, meaning you can start your new sewing project IMMEDIATELY, as I felt I needed to one night.  There are so many great things about this pattern: it looks good in a solid or a print, it only has two pattern pieces, the sizing is very forgiving, and the possible modifications are endless.  Like so many of their patterns, it also easily transitions from work to weekend, an element I want more of in my closet.  So far this summer I've made three. 

For the first two, I bought two quilting cottons from Peapod Fabrics.  I'm lucky enough to live very close to Peapod, and the owner carries a beautiful collection of prints.  I did the first tank, with no modifications to the pattern, out of the slightly heavier cotton print.  It's such a cheerful color, and goes so well with my red cardigan!
Colette Sorbetto #1
Sorry for the low-res photos. Yes, I've gotten into Instagram.
Originally I'd tried finishing the raw neckline and sleeve edges with a bright red ribbon, but it didn't look very good and the ribbon wouldn't lie flat. As I was making the bias tape from my fabric scraps, I remembered that since bias tape is cut diagonally to the warp & weft threads of a woven fabric, it has more stretch and give, allowing it to lie smoothly around the curved edges of the garment.  I've probably worn this tank top five or six times since finishing it.  Incidentally, I also used the continuous bias tape tutorial from the Colette blog, and it's my favorite way to make bias tape, especially if all you have is smaller scraps. 

For the second one, I had some 100% cotton lace edging that I knew I wanted to use.  After playing around with several options, I decided to put it around the neckline.  The effect is very sweet in a way that makes me think of Anne of Green Gables or Little House on the Prairie. It's not a look I go for every day, but I like it nonetheless. 
Colette Sorbetto #2
Taken before I'd finished the sleeves. 
This fabric was much more lightweight than the first one, and made me think that perhaps I could've used a bit more room in the bust on the first one.  I was reluctant to print out the entire pattern again just so I could cut a larger size, so before making the third one I decided to dive into doing my first full bust adjustment (FBA for short).  I sat down with my scissors, tape, extra paper, ruler, and then spent about two hours reading tutorials before I felt I had a good idea of what I was doing.  Because the Sorbetto doesn't have waist darts I ended up adding a significant amount of space to the waist circumference, so in the future I might grade that down just a bit to compensate.  This is what my pattern piece looked like before I filled in the gaps with extra paper.  I'm not sure that I drew the new bust dart in exactly the right place, but it gave me the extra room I was looking for. 
Adjusting the Sorbetto pattern
Doing a FBA makes you feel as smart as doing calculus. 
I also decided my third Sorbetto should be a tee instead of a tank, and I used the free sleeve pattern from Sew, Incidentally.  I was a little apprehensive that it only came in one size, but it worked like a charm.  In the future, I think this would be a great pattern to practice drafting sleeves for, since it's not too complex.  Once I'd attached the sleeves and tried on the top, it was immediately obvious how much the FBA helped.  I never realized how accustomed I'd become to wearing tops that never had enough fabric in the bust!  I actually have enough freedom of movement of my arms in this top, and the fronts of the sleeve seams aren't under strain.  This was a huge step for me in terms of expanding my sewing knowledge.  I pulled out a fat quarter of a sweet Liberty of London print for my bias tape edging, and improvised a keyhole opening at the back of the neck (I was inspired by the photo in the bias tape tutorial).  
Colette Sorbetto #3
Hanging from the door to our ironing board closet. 
The main fabric is a soft linen that I got from an enormous discount fabric store near my parents' home in southern California.  I have so many memories of going to this fabric store with my mom as a little kid, but that's another post for another day.  Here's a closeup of the back neck:
Back of Sorbetto #3
Those Liberty prints kill me every time!  So gorgeous!

The finishing is a little rough on the inside of that opening, but I'm pretty proud of myself for making it up.  These three tops are already in my regular rotation, and I'm certain I'll be making more from this pattern.  I've seen so many adorable variations: inverting the pleat, leaving the pleat open on the bottom, eliminating the pleat altogether, different sleeve styles, lengthening the bottom hem for a tunic or short dress... this dress and tank are two of my favorite versions of all the ones I've seen on the web. The only downside to all this sewing with woven fabrics is that I'm doing a lot more ironing in the mornings when I get ready for work, but it's so worth it knowing I'm wearing something that I made and that is truly unique!