Friday, April 9, 2010

Finishing Aphrodite

Every other time I've knit a lace shawl the blocking process has involved my living room (or, back in the day, dorm room) floor, lots of bending over leading to back aches, a crazy amount of straight pins, and generally an entire afternoon. Setting up the Honeybee Stole to block took so long that it was mostly dry by the time I had all the pins in! I'm happy to say that I've learned some things over the years, and with Aphrodite I went about my blocking the smart way.

First, I knew the floor was right out. I'd need to block on the bed, so that Starbuck wouldn't be able to get at it. And not because he wouldn't jump on the bed, because he will:

Aphrodite Unblocked

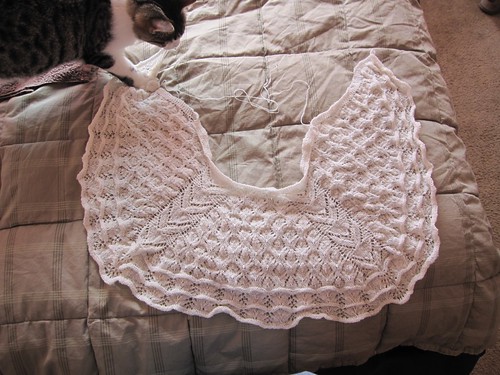
but because the bedroom has a door that can be closed.

Next, the pins situation. It's very difficult to block out knitting in a perfectly straight line with nothing but pins. I knew I really ought to use a set of blocking wires, but remembered that one can improvise with string. I couldn't remember exactly how it worked, so I looked up the Yarn Harlot's very handy post on the subject. Good thing I did, because otherwise I would have totally forgotten to put the thread in the shawl before washing the darn thing. It took me a surprisingly short amount of time to insert sewing thread along the outer straight edges, but I keep forgetting that Aphrodite is not that big of a shawl.

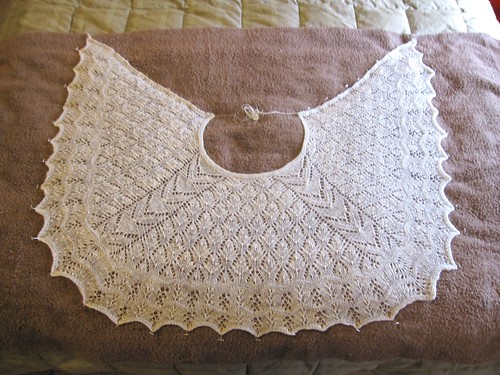
Aphrodite has three lovely reverse stockinette scallops running along the bottom edge, which I definitely did not want to block into points. I much preferred the look of the gently rolling edge shown in the original pattern photos. This was solved by placing the pins several rows in from the outer edge, and by not blocking the shawl too severely.

Aphrodite Blocking

I pinned out the corners and wrapped the blocking thread around those corner pins. The thread kept things in a nice straight line, although I did put a few pins in to keep the edge from bowing in at the middle.

Aphrodite Blocking

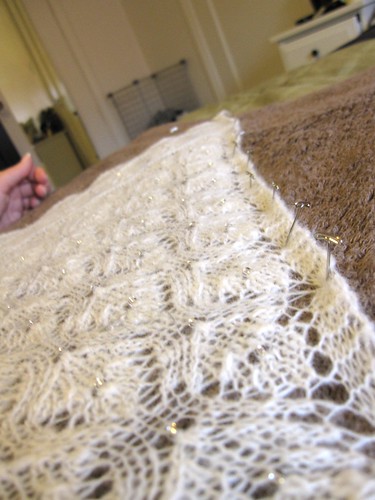
In the end, I only used about 50 pins total, which sounds like a lot, but really it isn't. I probably used 150-175 pins on the Honeybee. Once everything was pinned out, I made some adjustments to even out the scallop edge, then gave the whole thing a good spritz with the water bottle. It sat there for a few hours, and then came off the bed.

Aphrodite Blocking

I picked my dress up last weekend and promptly tried it on with the shawl. I ended up doing an in-between size from the two printed in the pattern, to make sure that the shawl was long enough but not too long. I'm very glad that I did, because the length came out perfectly. No pictures with the dress yet, but I'll post them once I have them. I couldn't do the outfit justice with a picture-in-the-mirror photo, and future hubs has decreed he does not want to see me in the full wedding getup until the wedding day. He also occasionally reads the blog, so yeah.

The pattern was fabulously written, although you have to be able to read a chart. Beading was something I'd never done before, and although I'm not a huge fan, I can't deny the results are stunning. If this is the only piece of knitting I ever make with beads, I'm glad I put the effort into something for my wedding day.

Saturday, April 3, 2010

Some non-fiber craftiness, Part II

So back when Future Hubs and I got engaged, we briefly toyed with the idea of self-printing all our paper products. At the time, I had no idea how much (or how little) that could entail. We still had more than a year and a half until the actual wedding and no fixed date, and it was nice to dream. Invitations were not something we could actively work on right away (not yet knowing when or where we were actually going to get married), so we put our ideas on the back burner.

Fast-forward to a few months ago, and we realize that we really don't have the time or energy to do DIY letterpress. With both of us working (no time to take classes although I still want to someday) and no money tree in the back yard (can't throw $$ at potentially crappy presses bought off eBay), we looked into buying letterpress invitations. Couldn't be THAT expensive, right? Wrong, as with so many aspects of hosting a wedding. After requesting a few quotes, we were resigned that letterpress was not going to work within our budget.

I want to pause a moment here, and talk about our motivation for having letterpress invitations. First, I'll point out that letterpress wedding invitations are exceedingly trendy right now, and there are lots of great, local places that will hook you up. The invitations look and feel fabulous, but they're still expensive, and that's just not for everyone. You don't need to have letterpress invitations to have a fabulous wedding. Ultimately, wedding invitations can be had for free.

The reason we like letterpress is the handcrafted nature of the end product, and the connection it has to a real person. When I took my Book Arts class at UCSC, I learned a little bit about typeface design (most of which I've forgotten) and Future Hubs is a self-described font geek. For us, the artistry inherent in the printed word and the connection with another human being is what hand-printed invitations are really about. We'd look into it even if everyone else wasn't doing it.

That's why we were so lucky to find Starshaped Press. Jen and Sarah use presses and type (real metal and wood type) the way I learned to in my Book Arts class. Their prices were shockingly reasonable compared to anyone else I'd talked to about hand printed invitations, and best of all, they said they'd use a linocut that I made. Future Hubs had his heart set on a large tree as part of our invitations (eventually we got to a point where he wouldn't look at anything else), but all their tree ornaments were rather small. We weren't just excited that they'd use our linocut. They'd use it with one of their existing invitation styles at no extra charge (and boy can those "custom work" charges pile up in the wedding invitation world)! Their samples package took my breath away. We were in Santa Cruz one afternoon, and I stopped by the same local art supply store that I bought my first linoleum block from, along with the carving tools. All that was left was to make the cuts.

Two weekends ago, I made a small tree, thinking we weren't going to have much room on the sheet for the image. Here's that result, on a 2x3 inch block:

Small Linocut

Then we got a few more samples, and I realized we'd want a bigger tree than the one I made. I wasn't too terribly pleased with the little one anyway, so I sat down to start working in earnest on the 3x5 block. Here's the setup: tools, materials, designs, and a snack.

Linocut Setup

The carving tool is not something to just hand over to your second-grader. It's a hard plastic handle, and several very sharp gouges that can be locked into place in the handle. So far, I've only stabbed myself once (which I count as very good considering I last did this 7 years ago).

Linocut Tool

First, I took out my sketch of the design:

Linocut sketch

As with all printmaking, you have to keep in mind that the image you carve into the linoleum will be mirrored in the print. This was a big pain in the butt when I did text on my Silmarillion poster, but not such a huge deal here. Next, I sketch the design onto the block:

Linocut and Sketch

After that, I put on an audiobook and started carving. Here's some of the outline:

Linocut Progress

I also experimented in a corner with some shading techniques. I love the way the bark looked on my Silmarillion tree, but wanted to do something more natural and less stylized for this one.

Linocut Progress

I tried that out on the small tree, but didn't like the way it looked. I did come up with a way to add depth to the leaves of the tree, and my grass started looking more and more natural, but I had to sleep on the bark. After some more experimental carving on Wednesday morning, I found something I liked. I hope it prints well.

Oak Tree Linocut

The linocut is off to Chicago.